


Here is a step by step guide on how to use our giant turntables. They're built to last and so easy to use that a kid could assemble them in 2 minutes.
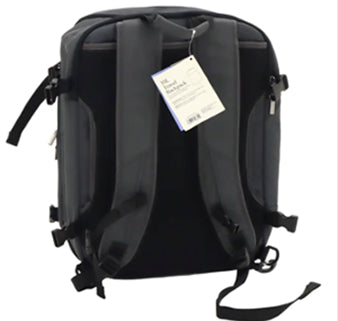
Target Open Story 35L Backpack
Using a 360° spin image on white
background, we were able to get this to
rank top 3 on Google ahead of eBay and
Amazon.
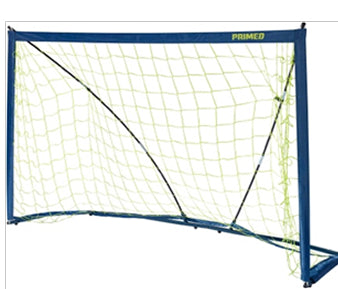
This product was able to rank above
Dick's (the manufacturer) and Amazon
after incorporating a 360° spin image.
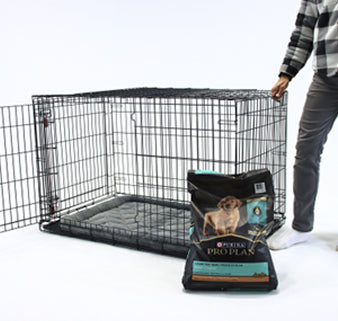
Within a month of launching this
product with a 360° spin image, it
ranked in the top 5 on Google,
further evidence of the power of
360 imagery.
Choose from a variety of our pre-set packages for your creatives.
Our patent-pending rotating platforms are used for 360 degree photos and videos of large items. Think: people, furniture, motorcycles and more.
They feature a "flippable" center hub that lets you either stop the turntable at exactly every 5 degree turn (for photo shoots) or rotate freely in a 360 degree turn (for video shoots).
SPECS: Weight limit 1,100 LBs | 94 inches wide x 94 inches deep (239cm x 239cm) | Baltic Birch Wood | No tools required.
Inside the two boxes that your Big Turn arrives in you will find the following parts: (a) StickyMat; (b) Center Hub; (c) 8 Wings; (d) BigTT Marker; (e) Canvas Bag of Caster Wheels.
Set up your own product photography studio in minutes. Big Turntables are made with simplicity and durability in mind.
The StickyMat prevents your turntable from sliding when turning. Lay it down in the center of your photoshoot area.
The Hub consists of 2 parts. The bottom part is flippable, with one side featuring grooves at exactly every 5° turn and the other side featuring a flat surface that allows for both photos at any stopping point and for video shoots.
Simply place the hub over the center of the Sticky Mat.
Pull out the 8 wings (4 wings in each box) and flip over the wings so that the 5 magnets under each wing are showing. You will attach 1 wheel to each of the magnets for a total of 5 wheels per wing.
With the wings turned over, take out the wheels in the canvas bag and attach 5 wheels to each of the 8 wings (see picture below).
With the wings turned over and the wheels attached to each magnet, you have the options of screwing the wheels into place.
Screws are not required - the wheels stick to the magnetized wings - but you can screw the wheels to the wings for added stability (optional).
With the wheels attached to the wings, now its time to attach the wings. First, find the wing with the arrow on it. Align that arrow with the arrow on the center hub and connect the wing. Then connect the rest of wings. No tools required.
Optional Step: For easy photo editing, lay a white cover sheet (roughly 8 feet x 8 feet) over the turntable. Use a white sheet for darker objects and light gray sheet for white objects.
NOTE: Using a green or black sheet (not recommended) will make image editing very hard and cause the colors to bleed onto object during a photo shoot.
Place your object(s) on the center of the turntable. Measure from both sides of the turntable for centering. Centering is important for creating a 360 degree spin image with a stationary center point.
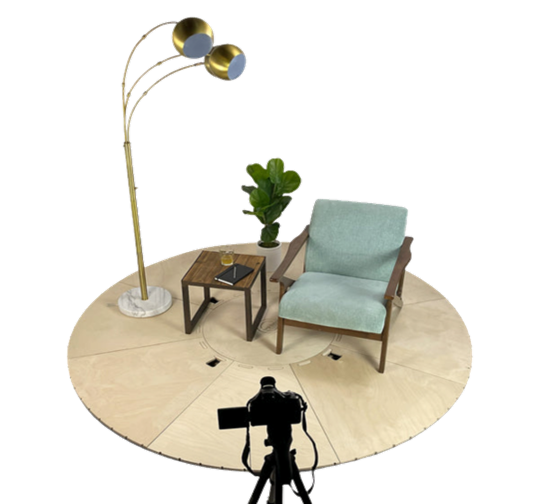
Now you're ready to take photos! Set up your tripod and start with the wing with an arrow facing the tripod.
Place the Big Turntables metal marker (or any other marker) on the floor in front of the arrow. This will help you keep track of the number of photos you have taken as you turn the turntable.
NOTE: The Big Turn can stop up to 72 times as it rotates around.
Now you're ready to take photos! The Big Turn can stop at every 5 degree turn or it can rotate freely for video shoots - just flip over the center hub piece.
In a full circle, you can take up to 72 photos of any object, perfect for creating a seamless 360 degree image of an object.
To turn the turntable, you can push with your foot or you can push with your hands. The Big Turn can hold up to 1,100 LBs (500 kg) and is so easy to turn even a child can turn it.
Tip*: Try purchasing a bluetooth clicker to sync up with your camera and take a photo at each turn with a click of a button.


